How to Clean a Keurig Coffee Maker with Vinegar
Keeping your Keurig coffee maker clean is essential in order to avoid the buildup of bacteria, mildew, and other microorganisms that can cause odors and spur illness. Cleaning a Keurig with vinegar is one of the best ways to keep your machine clean, as it has disinfectant properties that are beneficial to reducing the presence of germs.
Vinegar is also an effective cleaning agent because it neutralizes acids present in the machine and removes odors. Utilizing vinegar to clean a Keurig not only eliminates existing odors but also prevents future ones from forming. In this article, you will learn how to clean a Keurig with vinegar.
Read on for our helpful cleaning tips, so you can get your Keurig back up and running smoothly once again!
Step 1: Disassemble the Machine
Before starting the cleaning process, you’ll want to make sure to unplug your coffee maker and remove the carafe, water tank, and all other removable parts of the machine. While cleaning these components, make sure to avoid getting any liquid inside the internal components of the machine (brewing chamber and water reservoir).
If any liquid enters this area, you’ll want to clean it as soon as possible to avoid corrosion and damage to the machine. For best results, clean the inside of the water tank, the coffee basket, and the carafe by running plain water through each of these parts. Avoid adding vinegar to the water in these parts of the machine to reduce the risk of corrosion.
Step 2: Mix Vinegar and Water
For effective cleaning, you’ll want to utilize a 50/50 solution of vinegar and water. Mix the vinegar and water together in a container, then place the container inside the coffee maker. This way, the cleaning solution will remain inside the machine and not be wasted.
In order to maintain the warranty on your coffee maker, avoid using a cleaning solution that will damage the machine. Vinegar is safe for most appliances, but make sure to check for any restrictions or warnings before using it.
Step 3: Shake It Up!
Next, you’ll want to shake the solution inside the machine to reduce the chance of it forming a clog or residue inside the machine. After shaking the vinegar and water mixture, you’ll want to let it sit inside the Keurig machine for 24 hours. Avoid cleaning your coffee maker before this time has elapsed, as the vinegar needs time to break down any oils and deposits in the machine that cause odors.
Step 4: Rinse the K-Cup Holder and Discard Any Discolored Water
After the cleaning solution has sat in the machine for the recommended amount of time, you’ll want to remove the container and pour out any discolored water from the K-cup holder, the side of the brewing chamber, and the tank. Rinse out the K-cup holder with water to remove any vinegar residue.
If water remains in the tank, pour it out and rinse out the tank with plain water to remove any traces of vinegar. Avoid pouring out the cleaning solution from inside the tank, as it will not be able to be rinsed out.
Step 5: Mix Vinegar with Water and Discard This Solution
Next, pour a mixture of water and vinegar into the tank of the Keurig machine. Make sure to pour the solution into the tank, not inside any of the internal components. After pouring the vinegar and water mixture into the tank, you’ll want to run two to three cycles of plain water through the coffee maker to clean all parts of the machine.
After cleaning the machine with plain water, you can pour out the solution and discard it to avoid it from building up inside the machine.
Step 6: Use Vinegar to Clean the Brewing Chamber
While the cleaning solution is sitting inside the machine, you can clean the brewing chamber of the coffee maker. You’ll want to pour a generous amount of vinegar into the brewing chamber and let it sit for five to ten minutes. You can also use a soft bristle brush to scrub away any buildup on the inside of the brewing chamber.
After scrubbing the brewing chamber, you’ll want to pour out the vinegar and rinse out the chamber with water.
Step 7: Use Vinegar to Clean the K-Cup Holder and Inside of The Machine
After cleaning the brewing chamber, you can use the same mixture of vinegar and water to clean the inside of the machine and the K-cup holder. Pour the mixture into the water tank and run two to three cycles of plain water through the machine. Avoid cleaning the brewing chamber with the vinegar solution, as this may cause the vinegar to corrode the inside of the machine.
Step 8: Rinse Everything Again with Water
After cleaning the machine with the vinegar solution and plain water, you’ll want to rinse everything with fresh water to avoid leaving any traces of vinegar behind. This will help to neutralize the vinegar and prevent corrosion in the machine.
Disposing of K-Cup Residue
After cleaning the machine with vinegar, you’ll want to remove any traces of vinegar and rinse out the machine. Make sure to dispose of any k-cup residue that may be left inside the machine. To do this, you can run plain water through the machine two to three times.
How to Clean the Brewing Chamber
If you notice any build-up in the brewing chamber of your Keurig, you’ll want to clean it away immediately! Brewing coffee regularly leaves behind oils and residues that can contribute to a buildup of dirt and grime. Over time, this buildup can result in an unpleasant coffee taste.
To avoid this buildup and keep your coffee tasting fresh and clean, you can clean the brewing chamber of your Keurig with vinegar. Simply pour a generous amount of vinegar into the brewing chamber and let it sit for five to ten minutes.
Afterward, scrub the brewing chamber with a soft bristle brush to remove the buildup of oils and grime. Then, pour out the vinegar and rinse out the brewing chamber with water. By cleaning your brewing chamber with vinegar regularly, you can help to prolong the life of your Keurig and keep your coffee tasting fresh and clean!
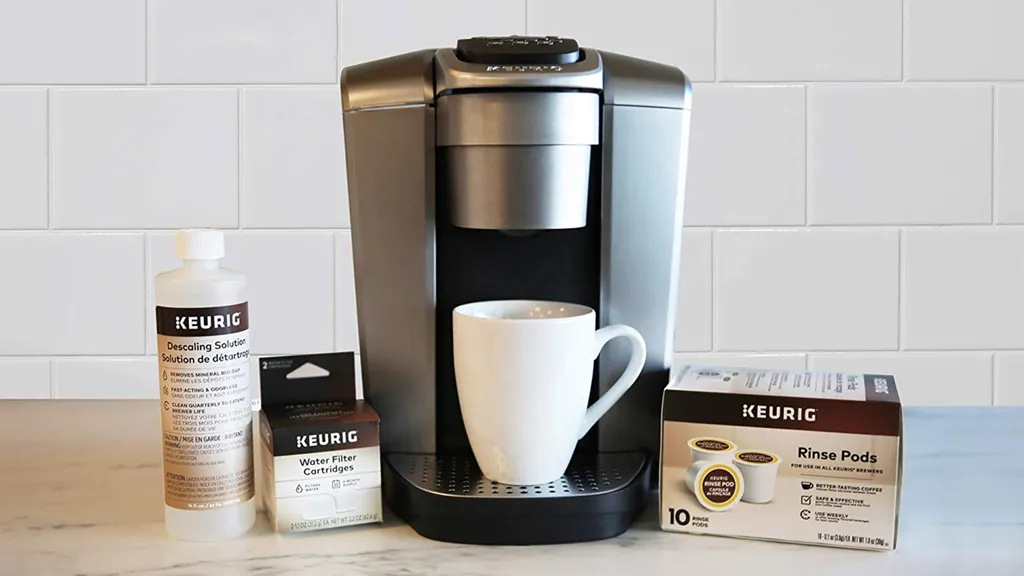
Keurig descaling solution
Keurig machines are designed to last for a long time, but they are not maintenance-free. If you want to keep your machine in top shape, you will need to clean it regularly.
To clean a Keurig, use descaling solution once a month. One of the best ways to clean your Keurig is with a descaling solution. When brewed, the solution removes calcium and other impurities from the machine’s water tank and other parts, maintaining the chemical balance of the water. To make your own descaling solution, mix one tablespoon of baking soda with two cups of water in a bowl.
Once the solution is ready, pour it into the water tank of your Keurig and let it sit overnight. Next, run two cycles of plain water through the machine to remove all of the impurities in the tank.
Neat descale reset
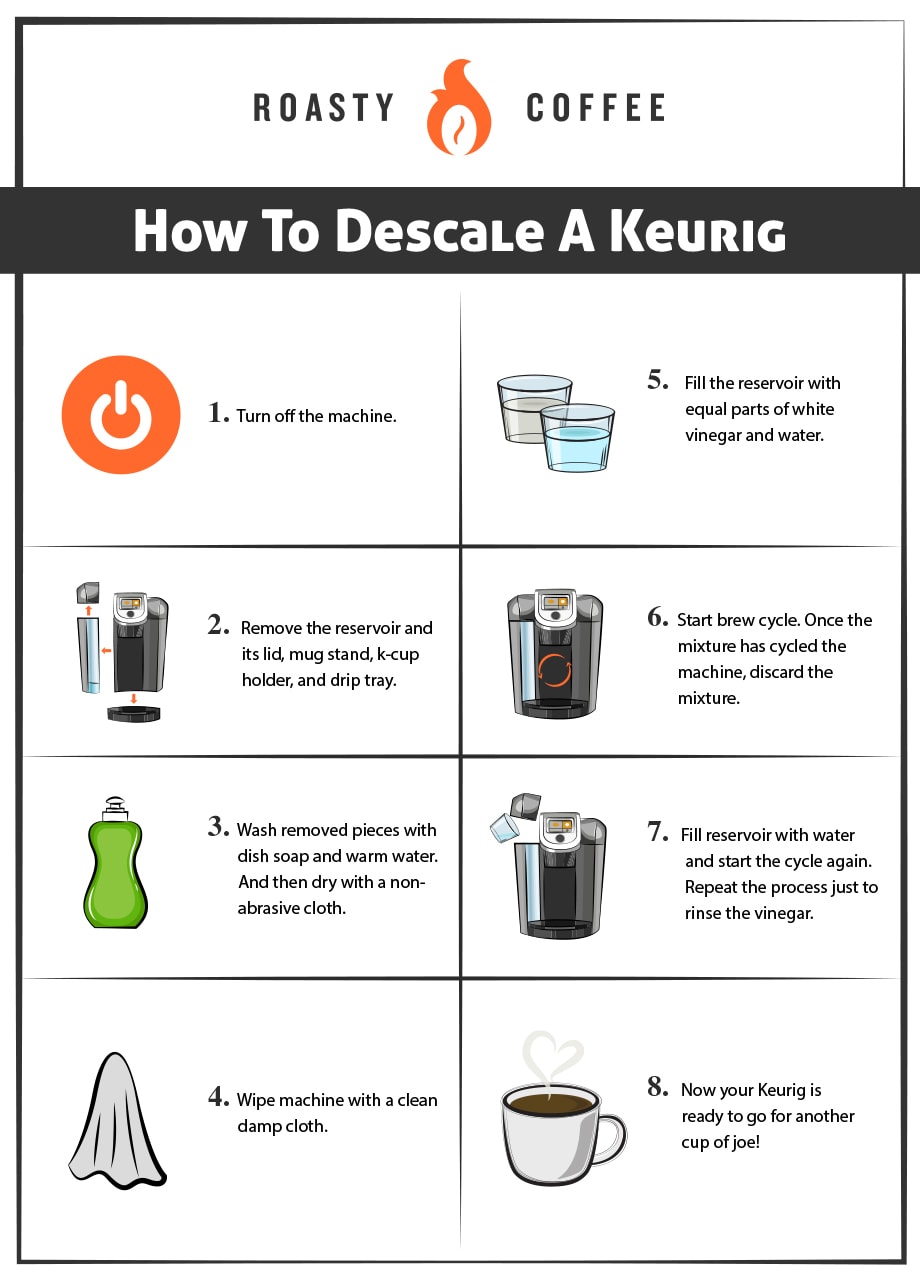
If you are having trouble with your Keurig machine, you may want to try using a neat descale reset. This process uses baking soda and vinegar to reset the internal machinery of your brewer. Before using this method, make sure you have turned off the power button on your machine.
First, fill a cup with vinegar and set it inside the machine. Next, add water to the water tank, up to about three-quarters of the capacity. Finally, close the lid and press the “brew” button to reset the machine. After three minutes, stop the machine and let the vinegar and water mixture sit in the water tank for at least an hour.
How to clean a Keurig without vinegar
If you do not want to use vinegar to clean your Keurig, you can try cleaning it with just water. To clean a Keurig with water, simply fill up a bowl with hot water and add a few drops of mild soap to it. Next, place one tablespoon of baking soda in the coffee basket of your brewer and run one cycle with plain water to clean the water tank and two cycles of water with the soapy mixture to clean the coffee basket.
After the cleaning cycle has ended, unplug your Keurig and pour out the water from the water tank and coffee basket. Finally, wipe down the outside of your Keurig with a damp cloth to remove any excess water.
How to descale Keurig duo with vinegar
If you have a Keurig brewer that features a descaling option, you should use it every two to three months. However, if you do not have this feature, you can still use vinegar to clean your Keurig. To clean a Keurig duo with vinegar, first, fill the water tank with two cups of water.
Next, add two tablespoons of white vinegar to the water and allow the machine to brew. Let the solution sit in the water tank for at least two hours. After two hours, run two cycles of plain water through the machine to remove the vinegar. Finally, wipe down the outside of your brewer with a damp cloth to remove any excess water.
How to descale Keurig slim with vinegar
If you have a slim coffee brewer, you may want to learn how to descale it with vinegar. To do so, first, pour one cup of white vinegar into the water tank. Next, run two cycles of plain water through the machine to remove the excess vinegar from the water tank. To finish cleaning your slim Keurig, wipe down the outside of the brewer with a damp cloth.
How often to clean Keurig
As mentioned, Keurig brewers need to be cleaned about once a month. However, you will want to clean your machine more often if you notice that it is starting to get dirty. Additionally, you should clean your Keurig machine after each use. Although it depends on the type of drink you make, the coffee grounds can leave quite a mess in your coffee maker.
How to clean Keurig needle
The needle inside the Keurig machine is the component responsible for spraying water over the coffee grounds. Over time, the needle may get clogged, which can cause your Keurig machine to stop working properly.
To clean a clogged needle, unplug your Keurig and remove the drip tray. Next, turn the machine upside down and tap it on a hard surface to dislodge any coffee grounds and other impurities that are stuck in the needle.
If the needle is still clogged after cleaning it, you may need to replace it. The needle is relatively inexpensive and easy to replace; you can find the replacement part on Keurig’s website.
How to clean a Keurig filter
The filter inside the water tank of your Keurig machine is designed to separate impurities from the water. However, this filter can become clogged with dirt and other impurities over time. To clean the filter in your Keurig machine, unplug your brewer and remove the water tank. Next, remove the filter from the water tank and either clean it with a cleaning solution or replace it with a new filter.
How much vinegar do I put in my Keurig to clean it?
To ensure you clean your Keurig machine thoroughly, use two cups of vinegar in the water tank. Alternatively, you can use two cups of white vinegar with two cups of warm water.
However, make sure not to use too much vinegar in your Keurig or you will damage it. Once you have finished cleaning your Keurig machine, you should rinse out the water tank and let it air dry.
How long do you let the vinegar sit in Keurig?
For best results, you should let the vinegar sit in your Keurig brewer for at least two hours. After two hours, you can run two cycles of plain water through your brewer to remove the excess vinegar. Finally, wipe down the outside of your machine with a damp cloth to remove any excess water.
Keurig brewers are excellent pieces of equipment, but they need to be cleaned regularly to maintain optimal functionality. By cleaning your Keurig with vinegar, you can effectively clean away harmful impurities, reduce odors, and prolong the life of your machine.
Now that you know how to clean a Keurig with vinegar, you can keep your machine in top shape. With these cleaning tips, you can ensure your machine is always functioning properly and ready to brew a fresh cup of coffee.
Will vinegar hurt a Keurig?
While vinegar can damage certain parts of the machine if left on them for an extended period of time, it is still one of the best cleaning agents for a Keurig. When vinegar interacts with the machine, it creates acetic acid, which is what causes the damage – but this effect is minimal compared to the benefits of using vinegar to clean.
If you have hard water, it is especially important to clean your Keurig regularly, as hard water can cause scale buildup inside the machine. When water sits in the machine for too long, minerals such as calcium, magnesium, and iron can build up. These minerals can clog the machine and decrease the flow rate of the water while also affecting the taste of your coffee.
If the machine is not descaled regularly, scale can build up so much that it blocks the holes in the machine at the end of the brewing cycle. This can cause water to overflow out of the machine and onto your countertop, creating an unnecessary mess.
What happens if you don’t descale your Keurig?
If you don’t descale your Keurig, the machine could end up clogged or unable to produce coffee at all. Moreover, without frequent descaling, your Keurig will be less efficient and might even emit an unpleasant odor.
Although descaling your machine is a simple process, many Keurig owners neglect to do so. If you are one of these people, you might notice that the water flow slows down or that it takes longer to brew a cup of coffee.
You may also notice an increase in the amount of time it takes for the coffee to be ready. If you continue to ignore the need for descaling, your machine will eventually stop working altogether!
How often should you clean your Keurig?
Since typical cleaning is not sufficient enough to remove all the bacteria in your Keurig, it is important to clean your machine regularly. The best way to clean your Keurig is to run vinegar through the machine every few weeks. The frequency with which you clean your machine will depend on how often you use it. If you drink coffee several times a day, the recommended cleaning frequency is about once a week. If you only drink one cup of coffee a week, you can clean your machine once every two or three weeks.
How long does it take to descale a Keurig?
A Keurig requires descaling every six months or so. The exact time between descalings will depend on how often you use your machine and how hard your water is. If you are unsure how often to descale your machine, it is best to follow the instructions that came with your Keurig.
When it comes to how long it takes to descale a Keurig, the process can take anywhere between five and 30 minutes. This is because the amount of time will vary depending on the amount of water in the machine and the hardness of the water being used.
You can estimate the time it will take to descale your machine by putting in the recommended amount of water and then adding five minutes for every 10 grains/milligrams of hardness in your water.
How do you reset a Keurig after descaling?
You can reset your Keurig after descaling with vinegar by simply running a few cups of fresh water through the machine. This will help to flush out the vinegar and reset the machine so you can start using it again.
If you descale your Keurig with something other than vinegar, it is a good idea to reset the machine by running a few cups of plain water through it. This will help flush out the chemicals left behind by your descaling agent and reset the machine to its normal operation so you can start brewing with clean water again.
Can Keurigs grow mold?
Keurig machines that are not cleaned regularly can grow mold and bacteria. Bacteria are microscopic organisms that live almost everywhere. While they may not sound very appealing, they are actually a normal part of everyday life. While some bacteria are beneficial, other types are considered contaminants, and a few are even harmful.
Mold is a type of fungi that grows in wet environments and can be found almost anywhere, including inside your Keurig machine if it is not cleaned regularly. Although most people associate mold with black stuff growing in their fridge, it can also grow in your Keurig.
The growth of mold and bacteria inside your Keurig can cause an unpleasant odor and make your coffee taste bad. It can also make your Keurig less efficient, causing it to take longer to brew a cup of coffee.
How do you know if your Keurig needs descaling?
There are a few indicators that your Keurig needs to be descaled. If you begin to notice an increase in the amount of time it takes for your machine to brew a cup of coffee, this could be a sign that your machine needs to be descaled. If the taste of your coffee seems off, it could also be a sign that you need to descale your Keurig.
If you suspect that your machine needs to be descaled, you can try using a water hardness testing strip. These strips are available at most hardware stores and can be used to test the hardness of your water. If the results of your water hardness test show that your water is more than 10 grains/milligrams per gallon hard, you should descale your Keurig.
If the results show that your water is between three and 10 grains/milligrams per gallon hard, you can probably wait until the next time you clean your machine to descale it.
How do you know if your Keurig needs to be cleaned?
Your Keurig may need to be cleaned if you begin to notice a change in its functionality. For example, if the coffee is taking longer to brew than normal, it might be a sign that your machine needs to be cleaned.
You can also test the buildup in your machine by filling it up with water and adding a few tablespoons of white vinegar. If there is a visible layer of sediment in the bottom of your machine after letting the water sit for a few hours, this is another indication that your machine needs to be cleaned.
How do you clean your Keurig without a reservoir?
In addition to cleaning the machine’s water reservoir, you should also clean the inside and outside of the machine every once in a while. To clean the inside, fill the machine with warm water and a few tablespoons of white vinegar.
Let the machine sit for about 15 minutes and then press the “brew” button to drain the water back out of the machine. The vinegar and warm water will clean out the inside of the machine while also rinsing away any minerals that may be clogging the machine.
For the outside of the machine, use a soft cloth to wipe away any coffee and water stains. You can also clean the machine with water, vinegar, and baking soda. Simply mix the cleaning agents together in a bowl and then use a sponge to scrub the outside of your Keurig.
Image 1 source: https://www.tomsguide.com/how-to/how-to-clean-a-keurig-coffee-maker
IMage 2 source:https://www.roastycoffee.com/keurig-descaling-solution-vs-vinegar/