How To Use A KitchenAid Ice Cream Maker: The Definitive Guide- 2 Easy Steps
Do you dream of eating homemade ice cream every day but find it too daunting a task to undertake? If so, the KitchenAid ice cream maker might be just what you need!
A home ice cream maker is an affordable and convenient way to make your own frozen desserts at home. They’re compact, easy-to-use appliances that will churn out perfect homemade ice cream in no time at all.
However, if you’ve never purchased or used a KitchenAid mixer before, using an ice cream maker might feel a little bit intimidating!
Don’t worry: we have all the information you need to get started on making delicious homemade ice cream easily and quickly. The social media feeds of foodies are filled with beautiful images of artisanal ice cream and sorbet. It seems like everyone is making their own in the kitchen.
And why not? Homemade ice cream is a delicious treat that’s easy to make at home, especially if you have the right tools. A KitchenAid ice cream maker is an excellent choice for anyone who wants to make their own home-made ice cream.
This compact appliance takes all the hard work out of making your own ice cream, sorbet, or any other frozen dessert that requires an ice-cream maker.
In this guide we will tell you everything you need to know about using a KitchenAid Ice Cream Maker. Continue reading to discover everything you need to know about using a KitchenAid Ice Cream Maker.
How To Use A KitchenAid Ice Cream Maker
The first and most important step when using an ice cream maker is to freeze the bowl. This will ensure that your ice cream doesn’t turn out too icy, as you’re essentially creating your own freezer at home.
Firstly, wash the bowl and the lid in warm soapy water and then leave them to air dry completely.
Next, place the bowl in your freezer for at least 8 hours before you plan to use the machine. You can use the bowl immediately after taking it out of the freezer, and it will keep in the freezer for up to 3 months.
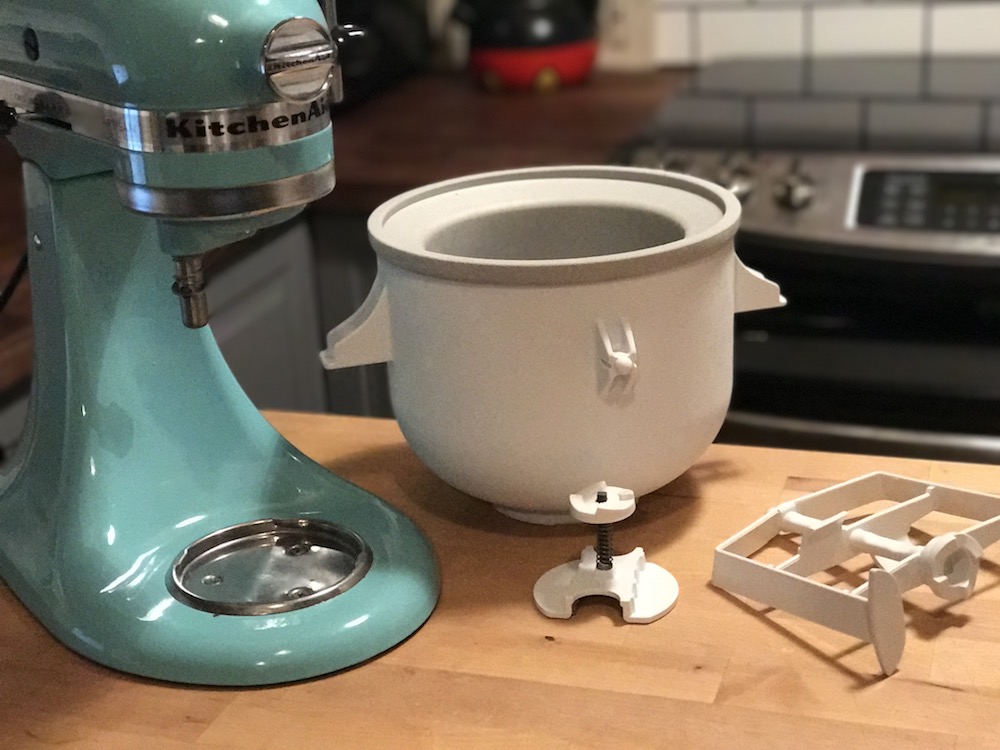
Put the bowl on the stand, then add the dasher (the churning paddle in your ice cream maker). The dasher is used to mix the ice cream ingredients and move them around the bowl during the freezing process. You can use the dasher on a stand mixer, food processor, blender, and hand mixer. Or, you can just use the bowl and a spoon.
Why Use An Ice Cream Maker?
If you love the taste of homemade ice cream but don’t fancy spending hours hand-churning it, then an ice cream maker is perfect for you.
Using an ice cream maker is a quick and easy way to make homemade ice cream at home that requires practically no effort on your part.
Using an ice cream maker is much cheaper than buying ready-made ice cream, as it only requires a few simple ingredients that you probably already have in your fridge.
You can also add mix-ins like berries, chocolate chips, or nuts to make the ice cream even more indulgent and delicious.
An ice cream maker also means you can create homemade ice cream flavours that would be difficult or impossible to make using an old-fashioned hand-churn method.
What Is a KitchenAid Ice Cream Maker?
KitchenAid ice cream makers are sleek, modern appliances that are designed to make the process of making homemade ice cream as easy as possible.
These ice cream makers are usually electric countertop appliances with a bowl and paddle that you place a mixture of ingredients into.
The mixture gets churned and frozen inside the bowl, and you can then serve the finished product from the bowl. KitchenAid ice cream makers are available in a range of sizes and styles.
Whether you want a small, single-serving ice cream machine for one or two people, or a large, family-sized ice cream maker that can make up to 1 quart of ice cream at a time, there’s an ice cream maker for you.
How Do You Use A KitchenAid Ice Cream Maker?
Before you start making your ice cream, you should freeze the bowl. Place the bowl of your ice cream maker in the freezer at least 8 hours before you plan to churn your ice cream.
This will ensure that the bowl is cold enough to freeze the ingredients properly, and helps prevent the ice cream from ending up too icy. Once the bowl is frozen, add your ingredients to the bowl.
For the best results, use at least 1/2 cup of liquid per 1/2 quart of ice cream and mix in any mix-ins at this stage. Close the lid and start churning.
Most KitchenAid ice cream makers require you to churn the ice cream for around 20-25 minutes. Once churning has finished, you can serve the ice cream straight from the bowl.
Best KitchenAid Ice Cream Makers For The Money
If you’re looking for an ice cream maker, you’re probably wondering which KitchenAid ice cream makers are best for the money. KitchenAid makes a range of ice cream makers, from small, single-serving ice cream machines to larger, family-sized ice cream makers.
You can also find KitchenAid ice cream maker recipes online if you want to try something other than vanilla ice cream. The KitchenAid Ice Cream Maker is a family-sized 1 quart ice cream maker that makes delicious ice cream with minimum effort.
This ice cream maker has a secure bowl clamp, a dasher with a soft-grip handle, and a large capacity bowl. This ice cream maker is also easy to clean, and comes with a recipe guide and an instruction booklet that will get you started in no time.
How To Use The Bowl Set And Ice Mix Together?
The bowl set and ice mix are two of the most important parts of the KitchenAid ice cream maker. The bowl set is the bowl you place in the ice cream maker, and it comes with the dasher (the paddle used to churn the ice cream).
The ice mix is the canister that holds the ice cream mix, and you place it in the bowl together with the bowl set and lid. The bowl set and ice mix are both dishwasher-safe, so you can clean them easily.
The ice mix has an opening where you can pour in the ice cream mix, but you may have to open the lid a little to pour in the ice cream mix.
How To Add The Base And Mix-Ins?
The base is an additional piece that goes on top of the ice cream bowl set. When the ice cream is churning in the bowl, the base is what keeps it secure in place and stops it from moving around.
Before you start churning the ice cream, add the base to the bowl set.
When you’re ready to add the mix-ins, remove the bowl set from the ice cream maker, open the lid, and add the mix-ins. Be sure not to add any mix-ins before the ice cream has begun to churn, as they may get caught in the dasher.
Final Words: Should You Buy A KitchenAid Ice Cream Maker?
If you love homemade ice cream but don’t have time to make it or don’t fancy spending hours hand-churning it, then an ice cream maker is perfect for you.
Using an ice cream maker is a quick and easy way to make your own delicious ice cream at home. An ice cream maker is a great investment for anyone who loves homemade ice cream but doesn’t have the time or patience to churn it by hand.
Using an ice cream maker is much cheaper than buying ready-made ice cream, as it only requires a few simple ingredients that you probably already have in your fridge.
You can also add mix-ins like berries, chocolate chips, or nuts to make the ice cream even more indulgent and delicious.
Image Source: How to make ice cream with KitchenAid Ice Cream Maker
Related Posts
How To Use an Ice Cream Maker: A Quick Guide for Beginners- 3 Good types
How to Install Inside Cabinet Lights – 3 Easy Steps
How to Choose the Right Downdraft, ceiling and island extractors- A perfect guide